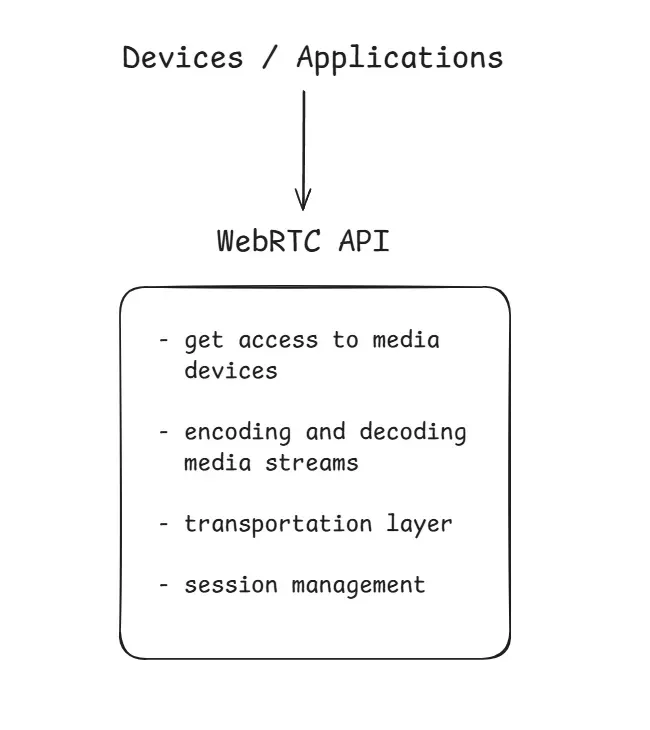
WebRTC is a technology that enables devices to send and receive media streams (audio and video). It uses WebRTC APIs for accessing the media devices (cameras and microphones), encoding and decoding media streams, and handling connections and transportation.
The WebRTC API mainly consists of 3 javascript objects:
- RTCPeerConnection
- MediaStream
- RTCDataChannel
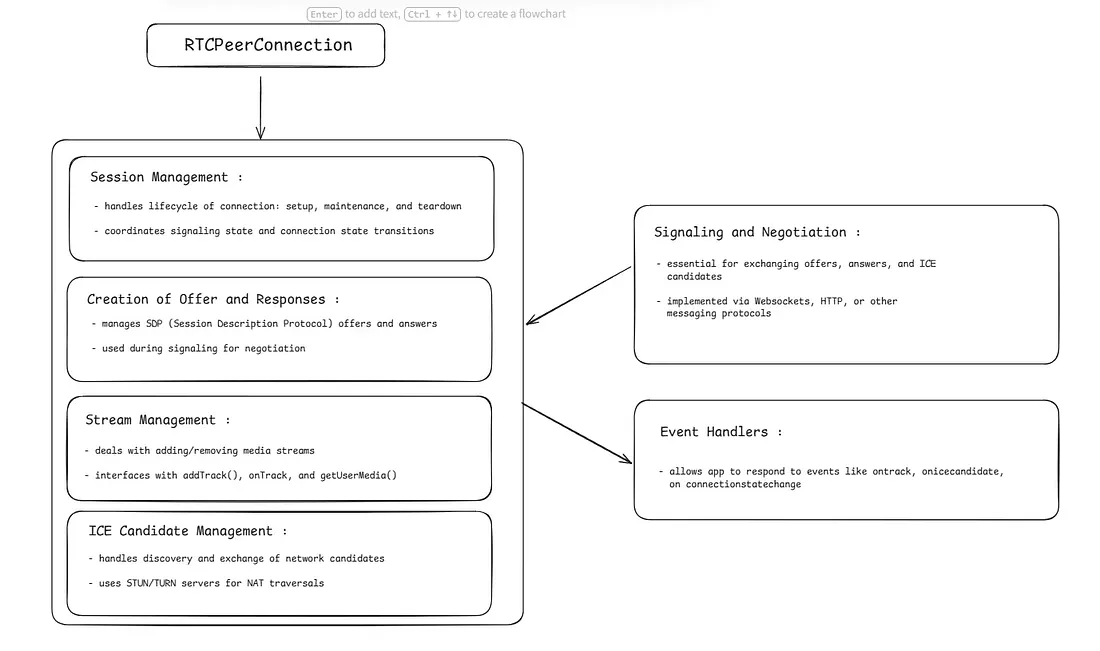
RTCPeerConnection
This object is responsible for initializing, setting up and creating a peer connection. It also manages the UDP connection with another user.
The RTCPeerConnection object can be created like:
var conn = new RTCPeerConnection(conf);The RTCPeerConnection object accepts a configuration parameter (conf), which typically includes at least one key like ICE servers and connection policies. iceServers is an array of STUN and/or TURN server configurations used to help peers (ICE candidates) discover the best network path to each other.
var conn = new RTCPeerConnection(conf);

conn.ontrack = function(event) {
  const stream = event.streams[0];
  // use stream here
};
The ontrack event is fired when the remote peer adds a media track (such as audio or video) to the connection. The incoming media is accessible through the event.streams array, usually as event.streams[0].
RTCPeerConnection Setup Process Between Peers
The setup process differs slightly depending on whether you're the caller (initiator) or the callee (responder):
- Register onicecandidate Handler: Each peer listens for ICE candidates (network paths). As candidates are discovered, they're sent to the remote peer via the signaling server.
- Register ontrack Handler: Handles incoming media from the remote peer.
- Handle Signaling Messages: Messages from the signaling server may contain:
RTCSessionDescription→ usesetRemoteDescription()for adding it to RTCPeerConnection objectRTCIceCandidate→ useaddIceCandidate()for adding it to RTCPeerConnection object
- Capture and Add Local Media: Use
getUserMedia()to get camera/mic input. Add tracks to the peer connection. - Offer/Answer Negotiation: This is the step where the flow gets different for the caller and the callee.
Caller:
- Starts with calling the
createOffer()method. - Sets local description with
setLocalDescription() - Sends offer to callee via signaling.
Callee:
- Waits for offer.
- Sets remote description
- Calls
createAnswer() - Sets local description
- Send answer back
- Starts with calling the
You should check RTCPeerConnection APIs properties, event handlers, and methods at: https://developer.mozilla.org/en-US/docs/Web/API/RTCPeerConnection
Let's Try Establishing a Connection
Note: Install ws and http-server from npm.
First create a websocket server (signalling server), server.js:
import { WebSocketServer } from 'ws';

const wss = new WebSocketServer({ port: 9090 });

wss.on('connection', socket => {
  console.log('Client connected');

  socket.on('message', message => {
    console.log('Received:', message);
    socket.send(JSON.stringify({ type: "login", success: true }));
  });
});
Create an index.html file, which will have 2 buttons: one for login and other for the username of the peer we want to connect to:
<html lang = "en">
<head>
<meta charset = "utf-8" />
</head>
<body>
<div>
<input type = "text" id = "loginInput" />
<button id = "loginBtn">Login</button>
</div>
<div>
<input type = "text" id = "otherUsernameInput" />
<button id = "connectToOtherUsernameBtn">Establish connection</button>
</div>
<script type="module" src = "index.js"></script>
</body>
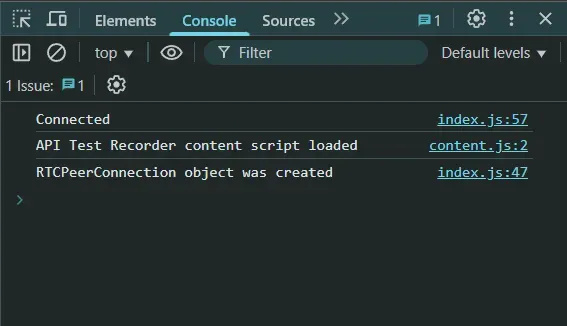
</html>Now we'll create an index.js file where we will first connect to our signaling server. When user logins, RTCPeerConnection object is created and setup onicecandidate handler which sends all found ICE candidates to the other peer.
Now we have to create an offer to the other peer. Add the following code in your index.js file:
// Setup a peer connection with another user
connectToOtherUsernameBtn.addEventListener("click", async () => {
  const otherUsername = otherUsernameInput.value;
  connectedUser = otherUsername;

  if (otherUsername.length > 0) {
    try {
      const offer = await myConnection.createOffer();
      await myConnection.setLocalDescription(offer);

      send({
        type: "offer",
        offer: offer
      });
    } catch (error) {
      alert("An error occurred while creating the offer.");
      console.error(error);
    }
  }
});

// When somebody wants to call us
async function onOffer(offer, name) {
  connectedUser = name;

  try {
    await myConnection.setRemoteDescription(new RTCSessionDescription(offer));
    const answer = await myConnection.createAnswer();
    await myConnection.setLocalDescription(answer);

    send({
      type: "answer",
      answer: answer
    });
  } catch (error) {
    alert("An error occurred while handling the offer.");
    console.error(error);
  }
}

// When another user answers our offer
async function onAnswer(answer) {
  try {
    await myConnection.setRemoteDescription(new RTCSessionDescription(answer));
  } catch (error) {
    console.error("Error setting remote description from answer:", error);
  }
}

// When we got an ICE candidate from another user
async function onCandidate(candidate) {
  try {
    await myConnection.addIceCandidate(new RTCIceCandidate(candidate));
  } catch (error) {
    console.error("Error adding received ICE candidate:", error);
  }
}
By clicking on the Establish Connection button, we make SDP offer to the peer.
MediaStream API
getUserMedia API, also known as MediaStream API, has the following functionalities:
- Provides access to stream object (video and audio).
- Manages the selection of media devices incase there are multiple of them.
- Provides security by always asking the user for permission before accessing their media devices.
NOTE: Each MediaStream object includes several MediaStreamTrack objects. They represent video and audio from different input devices. Each MediaStreamTrack object may include several channels (right and left audio channels). These are the smallest parts defined by the MediaStream API.
Once we have captured the MediaStream object via getUserMedia(), there are two primary ways we can use it:
Render MediaStream Locally i.e. display the captured media directly in the browser (Video/Audio Element):
const stream = await navigator.mediaDevices.getUserMedia({ video: true, audio: true });
const video = document.querySelector('video');
video.srcObject = stream;
Send MediaStream to a Remote Peer (RTCPeerConnection):
const peerConn = new RTCPeerConnection();
stream.getTracks().forEach(track => peerConn.addTrack(track, stream));
Let's Use This API in a Simple Manner
index.html:
<html>

   <head>
      <meta charset = "utf-8">
   </head>

   <body>
      <video autoplay></video>
      <script src = "index.js"></script>
   </body>

</html>index.js:
async function initUserMedia() {
  if (!navigator.mediaDevices || !navigator.mediaDevices.getUserMedia) {
    alert("Error. WebRTC is not supported!");
    return;
  }

  try {
    const stream = await navigator.mediaDevices.getUserMedia({ video: true, audio: true });
    const video = document.querySelector('video');
    video.srcObject = stream;
  } catch (err) {
    console.error("Error accessing media devices.", err);
  }
}

initUserMedia();
Now you can see your face by opening index.html.
Incase you are facing issues and not able to see your face by directly opening index.html, you can try one of following ways:
- Run
npm install http-server -g, then runhttp-server - If you have python installed, run
python -m http.server
You should check MediaStream APIs properties, event handlers, and methods at: https://developer.mozilla.org/en-US/docs/Web/API/MediaStream
RTCDataChannel
Along with media streams, one may also want to send additional data. This can be done using RTCDataChannel API. It creates a channel:
var peerConn = new RTCPeerConnection();

//establish peer connection

var dataChannel = peerConnection.createDataChannel("myChannel", dataChannelOptions);

// start sending direct messages to another peer
Apart from this everything is taken care of by the browser and this stays until the RTCPeerConnection object is closed.
You should check RTCDataChannel APIs properties, event handlers, and methods at: https://developer.mozilla.org/en-US/docs/Web/API/RTCDataChannel